Emma Squared Designs

Sunday, September 23, 2012

Chair and organization

****This post was originally written over 3 weeks ago. When I wrote it, I still had my big, beautiful, comfy chair...covered by a sheet and hidden under a ton of stuff. I have since SOLD the chair!!!******

My apartment is small, about 450 square feet. 
I am a pack rat. 
Do I need to say more? 
So I am trying to downsize.  
In my quest for making my apartment more livable, I have decided to sell a few things. I had a yard sale in July that netted a whole $25...loser of a sale.
Part of my quest involves getting things to make my apartment a little less...well, better organized. 

The first step in organizing is my crafts: 
These colorful baskets were 69 cents each at GoodWill and a little bit of spray paint and voila!
The red basket was a little more expensive at 79 cents...
Though it looks like I am making small changes in my quest for organization, every little bit counts. 
So if you have some suggestions on how to organize a little better for SMALL spaces, let me know. I could use all I can get!

Thanks...
Emma #1

P.S. I have craft stuff for sale. Here's some pictures for ya. Let me know if you are interested in buying any thing. 

Table and an apology

Hi Everyone (my one follower really...)
I am sorry I have been away so long. I have been busy doing all sorts of things like organizing my apartment, studying for a big test, making crafts, failing that big test, and making more crafts. Exciting stuff. If you were all here! 
I have some pictures for you. These pictures are of my new table project. My brother had a table from somewhere that is very sturdy and the perfect size for a small place. My mom has had it for the last couple of years and then finally gave it to me. I have been following a couple of blogs about home improvement type projects and was inspired! See HERE and HERE for some of my inspiration. These two ladies of the blog world are really talented! I am so thankful I stumbled on the blogs. 

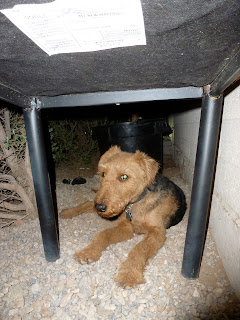
This is what it looked like when I started. (see Frankie under the table? He is clean cut - looks like a little professor. What a cutie!)
This is what the table looked like after I "sanded" it. Most of the original top peeled off years ago so it has had a rough top for a while.

This was the first attempt at creating a top worthy of my craft table. I bought a pack of pattern paper at Michael's for ONE CENT...You read that right! One center, it was on deep discount. the paper was too thick and rather clumsy. I ended up pulling it off because it just wasn't going to work. 
Next idea was to paint it. So I used white paint and used about 3 layers to cover up the original top of the table. I knew that wouldn't be the final top but a nice base to do something else. After I let that dry for two days, I decided it was time to make a decision on what to do with the table. 
I have been collecting tissue paper of all kinds for a while and didn't know what to do with it so when I needed to cover up the paint, color tissue paper was the answer...Voila!
Yup. Lookin' good. 
But that wasn't the end of it. I wanted something else on top and this is what I did: 
Yes, a McCalls pattern!
After a five layers of Polyurethane, we come to this:
So there you have it. My new craft table. When I finally finish rearranging my living room to my liking, this will be my primary table for doing work. It is durable, big, and sturdy. For now, it will be a good place to put my stuff as I organize. Oh, the final note is that the plastic guard was originally a dingy, beat up black...now it is Sage by Krylon. Lookin' GOOD!

I enjoy these kinds of projects. I should do them more often. Too bad I live in a shoe box, there is no room for more furniture projects. 

Enjoy the picture and let me know what you think of my newest project. 
Emma #1

Monday, August 6, 2012

Emma 2 and Noel

My dear niece, Emma 2, has been coming up with all sorts of crafts for us to while I visit her for a week or so. Emma 2 and a friend from church, we'll call her "Noel", have come up with a flower that can be made easily and quickly. It is made out of construction paper and tape.
Emma 2 and Noel have been friends for a while now and both are budding artists. Emma 2 loves to paint, sew, and do general paper crafts like me. Noel likes to paint and do paper crafts as well. Emma 2 told me that she and Noel are starting a craft club and are currently saving up money to buy artist canvas to paint on. I think they hope for this club to become lucrative one day. I have high hopes for them.
Now on to the paper flower. I believe it is a tulip of sorts.
Per Emma 2's request, here are the step-by-step instructions for making the flower:
1) you will need two pieces on construction paper and tape. One piece of paper should be green for the stem.
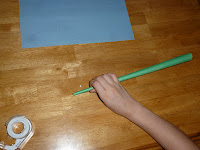
2) Roll the green paper, starting on the long side of the paper. Tape the paper in place. Set aside.
3) Fold the other paper in half along the long edge. Then fold in 1/2 again to make a smaller rectangle.
4) Holding one of the corners of the small rectangle, roll along the long edge to form the flower. Then tape in place.
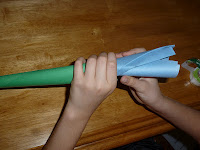
5) Place 2-3 pieces of rolled up tape (or use double sided tape) on the base of the flower. Place flower in the larger end of the rolled green paper.
Voila, you have a flower!
Make lots and place in a vase. Notice that some of Emma 2's flowers have cut edges, that is to add interest to the flower petals.
Emma 2 chose to make a vase out of a plastic bottle and construction paper.
 So there you have it. The first official project of Emma 2.


Monday, July 23, 2012

Flowers of the Field **Updated**

I love the passage in the Bible that reminds us to not worry about what we will eat or what we will wear...see how the flowers are dressed, even Solomon in all his glory was not as beautiful. (My words paraphrasing the bible.)
I found inspiration in that passage (Matthew 6:28-29) and made this:
Matt 6:28b-29 (NIV) See how the flowers of the field grow. They do not labor or spin. Yet I tell you that not even Solomon in all his splendor was dressed like one of these.

Flowers in nature are so beautiful. I don't think I could ever truly duplicate them but I tried.
This is what I did:

1. Shopped at Hobby Lobby where they had some pre-printed plaques on clearance.
2. Make fabric "Yo-Yos" with different fabrics (I used lots of scrap fabric, some of the ones you see in the picture are actually from dresses/shirts that Mom made me and my sister when we were young).
3. Mod Podge paper on the board as desired. (I first thought of using paint but it didn't work out too well).
 **NOTE: I am bad about taking pictures during the process...you are lucky to get the picture above!

4. Once dry, paint the paper to separate sky from grass. Let dry.
5. Tear out or cute out flower stems and flowers. Distress the stems and leafs as desired.
6. Once I figured out where I wanted the flowers, I Mod Podged the stems and leafs into place.
7.  For the Bible verse, I used letter stickers.
8. Before attaching the flowers, I covered the plaque with Mod Podge for protection.
9.  Finally, I attached the Yo-Yos with Aleene's Clear Gel Tacky Glue where desired.

And there you have it...
As my friend, Brian, used to say "done and done". :)


Emma #1

Sunday, July 15, 2012

Junk Journal & flowers

So, for a long time I have been eyeing the "SMASH*" books by K&Company (like what you can find HERE). I have never been able to bring myself to buy it because I just really, really, really didn't want to spend the money. So a couple of months ago, I saw on the Jennibellie blog, that she made her own and I was INSPIRED! I decided to make my own but I didn't want to make multiple covers for multiple books. I have canvas, paint, a sewing machine, buttons, and scissors...need I say more?
I used pinking sheers to cut the canvas then sewed around the perimiter to make sure it wouldn't fray. The background is actually spray mist - the green is from Ditto (bought at Michael's) and the blue is Maya Mists in Blue Raspberry Metallic Mist. The buttons are from Wal-Mart, brand called Blumenthal Lansing Co.. Oh and the pen is an official SMASH* pen. 

I haven't taken pictures of the inside yet but it is papers from my collection of patterned paper. When I start using it, I will take pictures.

I have also been working on flowers. Not the fabric ones seen on my junk journal but paper ones that are now adorning my bedroom. They are adorable!
 I have a flower garden above my bed. :)
Isn't it cute?
This is my favorite flower. The paper on top is from Cosmo Cricket, it is from Material Girl mini deck. I didn't make the swirl pattern on purpose...it was a total accident. A happy accident. 
This paper is from Die Cuts With a View The Naturals pack. The button in the middle is from my Grandma Davis's collection. I shall cherish it for ever!


This is my favorite of all the flowers - WHALES!!! The paper is from Echo Parch Splash 6x6 paper pack. The whale punch is a Martha Stewart punch. Isn't it cute? Oh, and the edge has been punched with the Fiskars Wave border punch. 
I now wake up every morning with loving goodness twirling above my head...

Thanks for stopping by.

Emma 1

P.S. Though I live in a desert, I SAW humidity today. Yes, that's right...I SAW HUMIDITY!!! Doesn't happen often. In fact, in the 9 years I have lived here, I have never seen humidity in the air. Here's a picture of it:
I know it is hard to tell, but the haze in the distance is not smog but HUMIDITY!!!

Wednesday, July 4, 2012

Fences make the best neighbors...

So I have heard that fences make the best neighbors. I assume it means wooden fences to keep you separate from your neighbors. I have lived mostly in houses with chain-link fences so I don't think that saying counted for me. Being an apartment dweller for over 10 years now, I don't have fences of any kind.
I mention fences because I made one. A little one. Paper and paint. The fence couldn't keep my dog, Frankie, in for even a second...but that is because the fence is about 5 inches tall and 16 inches long. Since pictures are worth a thousand words, I will just show you pictures.

The canvases I used are 8x8 inches but the fence is longer so they look like long canvases.
The back ground is papered napkins that were on clearance. I separated the layers and used the thin top layer with all the colors and Mod Podged them on (exactly what I did for the chalkboard frame in the previous post). Once that dried, I tore papers for the tree and the flowers. I didn't use any punches for those so they are all different sizes.
The fence was my favorite part. I have a trellis punch from Martha Stewart that I used to punch the top part of the fence. Then I cut a bunch of strips of plain white paper, distressed the edges, and painted the same color as the trellis. It turned out great! I hot glued the two canvases together so they will stay together. 
 Apparently, I am obsessed with trees like this! Just wait until it's fall. All I will be doing is making trees with fall colors!!!
 These pictures don't do it justice. If only I could take better pictures. I might have to hire my cousin, a budding professional photographer, to come out for a photo shout!!!
 All the flowers were made from the Cosmo Cricket 6x6 mini stack called Material Girl. the brads are from my stash and I have no specific brand name for them, sorry.
I hope you like my latest mixed media canvas. I think it turned out really nice. I wonder if I should give it to someone or just keep for myself. 
What are your thoughts on making things like this for other people, keeping for yourself, or selling...I never know exactly what to do. 

Thanks for stopping by. 

Emma1

P.S. Here is Frankie. Isn't he cute??? He was resting outside on a hot night. I love my baby!


Sunday, June 24, 2012

Childhood Revisited

When I was growing up the writing instrument in our classrooms was a chalkboard. Those don't exist much in classrooms anymore because teachers have become allergic to chalk dust. That is very sad to me because as much as I enjoy a whiteboard, chalkboards are the BOMB DIGITY!
Another reason I love chalkboards is that when I was a kid, I dreamed of being a teacher who could use a chalkboard. I never did become a teacher but now I have my chalk board!
So to reconnect with my childhood, I made myself a chalkboard. I found some awesome paint by FolkArt that is "Chalkboard Paint" and I LOVE IT!!! (I try not to love inanimate objects but I have to love it...I just do!)
I had this paint for months without using it because I just couldn't find the right project to make. Then I pushed myself to focus on making something. I took a trip to Hobby Lobby and found exactly what I wanted and it turned out PERFECT!!!
The chalkboard size is 11x14 and it is actually an Ampersand Gessoed Masonite Board! It is a type of canvas, great for painting...No, really! CANVAS! It is amazing stuff and perfect for this project.
The frame is just your basic wood frame for an 11x14 canvas. I used paper napkins and Mod Podge to decorate the frame. I didn't paint all those polka-dots...I am not that talented. The napkins worked out great! It gave lots texture and added that flair that I like.
See the flowers? I finally figured out how to make the paper rolled flowers. And I really enjoyed making them. The papers are from lots of paper packs, sorry for not having the exact names.
Here are some close ups:
 So there you have it...my childhood revisited. I have it hanging on my living room wall right now using it as a countdown calendar for my big test coming up at work. I so enjoy writing on a chalkboard and think it will be a well used addition to my house. One point of future addition: I will be making some sort of chalk holder and I have a terrific idea in mind. I just need to put it off until after the big test is done on July 12th.
Thanks for stopping by, hope you enjoyed my walk-down-memory-lane, and leave a comment so I know you came by!

Emma1

P.S. In case you are wondering what the orange and purple thing is above the chalkboard, look below:
These are picture boards that I made are made out of back-stapled canvases from Michael's, orange polka-dot napkins, Mod Podge, purple ribbon, and buttons. I did poke holes through the canvas to attach some buttons with waxed-linen thread and Aleena's Clear Gel Tacky Glue for the other buttons. I haven't added any pictures to the boards yet but this is just day one of their existence. I will probably take those boards to work and put them on my desk to enjoy them there. We'll see how that works.


Saturday, June 23, 2012

Another "Welcome Home" Canvas

I find inspiration everywhere. I don't always know how to turn that inspiration into something real but this time I did. I have tried for a long time to make those paper rolled flowers but never was able to make any. Then I tried to make them again...and this time, IT WORKED!!! The flowers I originally made for this project ended up being too big so I used those on another project and made small ones for this project. 
My dear friend, Gina Maria Louisa Rita*, bought a house over a year ago and has on several occasions invited me to her house but things haven't worked out for me to get there. Then it came to my attention that I had not made a "house warming" present for Gina so I made this: 
The canvas is 8x8, or was it 10x10...can't remember now. The color is a combination of spray mists. The green is Maya Road Lime Metallic Mist mixed with Maya Road Pearl Metallic Mist. The blue is Ditto Glimmer Spray in a deep blue color (no name provided). Most of the papers for the flowers are from 6x6 paper packs that I have but don't remember who they are. I am so sorry for not knowing that. but they are all really cute paper. The letters are BasicGrey Dark Chocolate Chip Micro-Chip Stickers. One of the reasons the final version is so shinny is because I used a spray fixative as the final coat. Since Maya Road Mists are not waterproof, I thought it might help to have a fixative on it. 

 Before it was finished, I added some glitter glue to the center of the flowers. Honestly, if I did this again, I would not add the glitter glue. I didn't really like how it turned out. The green and purple glitter glue is from Studio G (Michael's Dollar bins) and the black is Black Diamond Stickles.
Gina's reaction was WONDERFUL! I actually love having her look at my crafts because she ALWAYS loves everything I make. It really gives me an ego boost when Gina reacts the way she does. She is also a hugger! She has the best hugs and they are so strong, I feel like my head could pop off at any second! :)
Gina said she will take picture of the canvas's when she puts them up so I will post on here when she does.

Enjoy and I will catch you later!

Emma1

*Names have been changed to protect the innocent. Though the first name is her real name. The rest I made up. :)