Emma Squared Designs

Showing posts with label canvas. Show all posts

Friday, June 14, 2013

Painted Canvas with a Message

A lot of crafters (a.k.a. artists) are making "mixed media" wall hangings. I don't know the official definition of "mixed media" but from what I have seen it means to use lots of different materials that wouldn't normally be used together to make a project. For example, use paint, paper, stickers, stencils, tissue paper, and Mod Podge. I have been making wall hangings that have a message. Not just nice words but meaningful words. I have been putting inspirational bible verses on many of my wall hangings lately and thought I would show you. Each of the canvases has 2 coats of matte Mod Podge to protect it from the elements. 
This a 10 in x 10 in deep wrapped canvas. I believe I used brown tissue paper for texture, while paint as the bottom coat. For the top coat, I used the Adirondack Brights Acrylic paint in POOL color. The Instagram filter I used made the color look darker blue. One of my favorite verses. My grandma (posted about previously) had horrible twisted feet from arthritis and couldn't wash her feet herself. When I would visit her, I would wash her feet. So this verse is of particular importance to me. 

For this canvas, I used a brown tissue paper for texture then I used a purple paint and a Heidi Swapp Hexagon stencil for interest. This canvas is 12 in x 12 in about 1 inch deep. All the rest of the canvases are this size as well. I have lots of letter stickers so spelled out the words I wanted to Romans 12:2a then blotted an orange and white paint on top. Once the letters were fully covered, I pulled them off to reveal the purple paint underneath. I like this because of the different font stickers I used. 
This was actually the first bible verse canvas I made. It has white tissue paper for texture, blue/white paint for the base coat. Then I used stickers to spell out what I wanted it to (one of my favorite bible verses for when I am anxious or nervous). I used a gray color paint on top and pulled off the stickers. 

This is my most recent canvas. To be honest, it doesn't really fit in with the other canvases. With the ones pictured above, I applied stickers, painted over them and pulled the stickers off to reveal the colors underneath. When I made this canvas, I used tissue paper, black paint, gray paint, and one Christy Tomlinson's She Art Vintage Doily stencil. Once I placed the white letter stickers on top, it just looked RIGHT. For those of you who are spell checking, there is a mistake in the spelling of one of the words. I know what it is, you don't need to point it out to me. In my defense I was spelling backwards and from the bottom to get the look of the right alignment that I wanted.

This one was a super fun mixed media canvas to make. It was time consuming in the respect that I wanted to make it perfect so I made it over several weeks. The camera in the middle is a die-cut I made. I sketched a picture of a camera I found online, transferred it to a piece of thick water color paper, then painted it in. The letters, from We R Memory Keepers chipboard alphabet stickers "For the Record" series in this nice off white color. I think it turned out super duper nice. 
I made this canvas for my cousin, Jenn Wiemann. She is starting a photography business and a new mom so it just made sense that I would make this for her. To be honest, I did not come up with this all on my own. I check out a lot of craft blogs and one of the many blogs I was looking at one day, I found a really great picture frame wall art with this same idea. If I can find the blog online again, I will post the link here. 

Thanks for stopping by. If you like it, let me know. 

Emma #1

Wednesday, July 4, 2012

Fences make the best neighbors...

So I have heard that fences make the best neighbors. I assume it means wooden fences to keep you separate from your neighbors. I have lived mostly in houses with chain-link fences so I don't think that saying counted for me. Being an apartment dweller for over 10 years now, I don't have fences of any kind.
I mention fences because I made one. A little one. Paper and paint. The fence couldn't keep my dog, Frankie, in for even a second...but that is because the fence is about 5 inches tall and 16 inches long. Since pictures are worth a thousand words, I will just show you pictures.

The canvases I used are 8x8 inches but the fence is longer so they look like long canvases.
The back ground is papered napkins that were on clearance. I separated the layers and used the thin top layer with all the colors and Mod Podged them on (exactly what I did for the chalkboard frame in the previous post). Once that dried, I tore papers for the tree and the flowers. I didn't use any punches for those so they are all different sizes.
The fence was my favorite part. I have a trellis punch from Martha Stewart that I used to punch the top part of the fence. Then I cut a bunch of strips of plain white paper, distressed the edges, and painted the same color as the trellis. It turned out great! I hot glued the two canvases together so they will stay together. 
 Apparently, I am obsessed with trees like this! Just wait until it's fall. All I will be doing is making trees with fall colors!!!
 These pictures don't do it justice. If only I could take better pictures. I might have to hire my cousin, a budding professional photographer, to come out for a photo shout!!!
 All the flowers were made from the Cosmo Cricket 6x6 mini stack called Material Girl. the brads are from my stash and I have no specific brand name for them, sorry.
I hope you like my latest mixed media canvas. I think it turned out really nice. I wonder if I should give it to someone or just keep for myself. 
What are your thoughts on making things like this for other people, keeping for yourself, or selling...I never know exactly what to do. 

Thanks for stopping by. 

Emma1

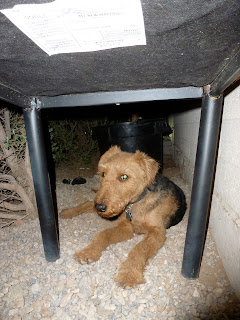
P.S. Here is Frankie. Isn't he cute??? He was resting outside on a hot night. I love my baby!


Sunday, June 24, 2012

Childhood Revisited

When I was growing up the writing instrument in our classrooms was a chalkboard. Those don't exist much in classrooms anymore because teachers have become allergic to chalk dust. That is very sad to me because as much as I enjoy a whiteboard, chalkboards are the BOMB DIGITY!
Another reason I love chalkboards is that when I was a kid, I dreamed of being a teacher who could use a chalkboard. I never did become a teacher but now I have my chalk board!
So to reconnect with my childhood, I made myself a chalkboard. I found some awesome paint by FolkArt that is "Chalkboard Paint" and I LOVE IT!!! (I try not to love inanimate objects but I have to love it...I just do!)
I had this paint for months without using it because I just couldn't find the right project to make. Then I pushed myself to focus on making something. I took a trip to Hobby Lobby and found exactly what I wanted and it turned out PERFECT!!!
The chalkboard size is 11x14 and it is actually an Ampersand Gessoed Masonite Board! It is a type of canvas, great for painting...No, really! CANVAS! It is amazing stuff and perfect for this project.
The frame is just your basic wood frame for an 11x14 canvas. I used paper napkins and Mod Podge to decorate the frame. I didn't paint all those polka-dots...I am not that talented. The napkins worked out great! It gave lots texture and added that flair that I like.
See the flowers? I finally figured out how to make the paper rolled flowers. And I really enjoyed making them. The papers are from lots of paper packs, sorry for not having the exact names.
Here are some close ups:
 So there you have it...my childhood revisited. I have it hanging on my living room wall right now using it as a countdown calendar for my big test coming up at work. I so enjoy writing on a chalkboard and think it will be a well used addition to my house. One point of future addition: I will be making some sort of chalk holder and I have a terrific idea in mind. I just need to put it off until after the big test is done on July 12th.
Thanks for stopping by, hope you enjoyed my walk-down-memory-lane, and leave a comment so I know you came by!

Emma1

P.S. In case you are wondering what the orange and purple thing is above the chalkboard, look below:
These are picture boards that I made are made out of back-stapled canvases from Michael's, orange polka-dot napkins, Mod Podge, purple ribbon, and buttons. I did poke holes through the canvas to attach some buttons with waxed-linen thread and Aleena's Clear Gel Tacky Glue for the other buttons. I haven't added any pictures to the boards yet but this is just day one of their existence. I will probably take those boards to work and put them on my desk to enjoy them there. We'll see how that works.


Saturday, June 23, 2012

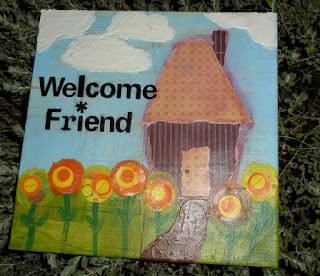
Another "Welcome Home" Canvas

I find inspiration everywhere. I don't always know how to turn that inspiration into something real but this time I did. I have tried for a long time to make those paper rolled flowers but never was able to make any. Then I tried to make them again...and this time, IT WORKED!!! The flowers I originally made for this project ended up being too big so I used those on another project and made small ones for this project. 
My dear friend, Gina Maria Louisa Rita*, bought a house over a year ago and has on several occasions invited me to her house but things haven't worked out for me to get there. Then it came to my attention that I had not made a "house warming" present for Gina so I made this: 
The canvas is 8x8, or was it 10x10...can't remember now. The color is a combination of spray mists. The green is Maya Road Lime Metallic Mist mixed with Maya Road Pearl Metallic Mist. The blue is Ditto Glimmer Spray in a deep blue color (no name provided). Most of the papers for the flowers are from 6x6 paper packs that I have but don't remember who they are. I am so sorry for not knowing that. but they are all really cute paper. The letters are BasicGrey Dark Chocolate Chip Micro-Chip Stickers. One of the reasons the final version is so shinny is because I used a spray fixative as the final coat. Since Maya Road Mists are not waterproof, I thought it might help to have a fixative on it. 

 Before it was finished, I added some glitter glue to the center of the flowers. Honestly, if I did this again, I would not add the glitter glue. I didn't really like how it turned out. The green and purple glitter glue is from Studio G (Michael's Dollar bins) and the black is Black Diamond Stickles.
Gina's reaction was WONDERFUL! I actually love having her look at my crafts because she ALWAYS loves everything I make. It really gives me an ego boost when Gina reacts the way she does. She is also a hugger! She has the best hugs and they are so strong, I feel like my head could pop off at any second! :)
Gina said she will take picture of the canvas's when she puts them up so I will post on here when she does.

Enjoy and I will catch you later!

Emma1

*Names have been changed to protect the innocent. Though the first name is her real name. The rest I made up. :)

Wednesday, June 13, 2012

Welcome Gnome...House Warming Gift

My best friend, whom I call "Chickadee", got married on May 19th. She is such a wonderful person and am so very thankful that God put her in my life. Mr. & Mrs. Chickadee also just bought a house so what I made for them should fit right in. 
Chickadee likes gnomes and I am sure these gnomes will like hanging on the wall in her new home. 
I used three 6x6 deep canvases from my local craft store. I believe the brand is Artist's Loft. 
I used an old Butterick clothing pattern and Mod Podge to prepare the canvas. Once dried, I painted the grass and sky. Before the paint dried, I wiped off as much of the thick paint as possible. I did this so that the pattern will show through the paint. 
Next, I used the "My Little Friend"clear stamp set from There She Goes stamp company. The clouds and sun were painted on with Golden Molding Paste mixed with paint.  

I plan on giving Mrs. Chickadee this home warming gift tomorrow. I am sure she will like it because she always tells me that she likes my crafts. She is such a supportive friend...
Enjoy and if you make something like this, please post a comments & picture. I would love to see what you make. 

Emma1

P.S. on a side note, Emma 2 & Family might be moving into a house of their own in the next couple of months. Emma 2's mom (my sister) & her husband have found the house they want and put a bit on it today. We are praying that if this is the house the Lord wants them in, He will make it work out!


Tuesday, June 5, 2012

Mixed Media Wall Art

I have really started to get into mixed media wall art. There is a lot of inspiration out there on the internet like this website and this website. Stephanie Ackerman and Christy Tomlison are very talented women and I have learned quite a bit from both of them.
That brings me to my most recent creation:

These wall art pieces are done on 12x12 painting canvas. I did not prepare the canvas in any unique way, just started Mod Podging old Butterick patterns on the canvas; then added a light layer of paint once the Mod Podge dried. The tree, flowers, and house are paper pieced on the canvas. The clouds and walkway on the cottage canvas are a mixture of paint and molding paste. SO MUCH FUN!!! I still have a few things to add to the cottage canvas so I will put a final picture up when I am done. 

Thanks for stopping by and watch for the next installment of Mixed Media Wall Art. :)

Emma 1

*********************************************************************************
***********************************UPDATE**************************************

Here is the finished house canvas...Let me know what you think.
The photo isn't great but I think you get the idea. :)